>sudo apt-get install uswsusp
test commandnya dlu
sudo s2ram
sudo s2disk
lalu
sudo nano /etc/pm/config.d/00sleep_module
SLEEP_MODULE=uswsusp
tmbhkan saja line baru, mskipun kosong

>sudo apt-get install uswsusp
test commandnya dlu
sudo s2ram
sudo s2disk
lalu
sudo nano /etc/pm/config.d/00sleep_module
SLEEP_MODULE=uswsusp
tmbhkan saja line baru, mskipun kosong
>

>
>singkast saja
$ sudo apt-get install slim xdm
$ sudo dpkg-reconfigure xdm (plih xdm sebagai default)
$ sudo leafpad /etc/init.d/xdm
ubah menjadi
#!/bin/sh
# $Id: xdm.init 996 2006-01-02 19:27:34Z ender $
# Copyright 1998-2002, 2004, 2005 Branden Robinson .
# Copyright 2006 Eugene Konev
#
# This is free software; you may redistribute it and/or modify
# it under the terms of the GNU General Public License as
# published by the Free Software Foundation; either version 2,
# or (at your option) any later version.
#
# This is distributed in the hope that it will be useful, but
# WITHOUT ANY WARRANTY; without even the implied warranty of
# MERCHANTABILITY or FITNESS FOR A PARTICULAR PURPOSE. See the
# GNU General Public License for more details.
#
# You should have received a copy of the GNU General Public License with
# the Debian operating system, in /usr/share/common-licenses/GPL; if
# not, write to the Free Software Foundation, Inc., 59 Temple Place,
# Suite 330, Boston, MA 02111-1307 USA
### BEGIN INIT INFO
# Provides: xdm
# Required-Start: $local_fs $remote_fs
# Required-Stop: $local_fs $remote_fs
# Should-Start: xfs $named slapd hal
# Should-Stop: xfs $named slapd hal
# Default-Start: 2 3 4 5
# Default-Stop: 0 1 6
### END INIT INFO
set -e
# To start xdm even if it is not the default display manager, change
# HEED_DEFAULT_DISPLAY_MANAGER to “false.”
# Also overridable from command line like:
# HEED_DEFAULT_DISPLAY_MANAGER=false /etc/init.d/xdm start
[ -z “$HEED_DEFAULT_DISPLAY_MANAGER” ] && HEED_DEFAULT_DISPLAY_MANAGER=true
DEFAULT_DISPLAY_MANAGER_FILE=”slim”
PATH=/usr/local/sbin:/usr/local/bin:/usr/sbin:/usr/bin:/sbin:/bin:/usr/games
DAEMON=/usr/bin/slim
PIDFILE=/var/run/xdm.pid
test -x $DAEMON || exit 0
. /lib/lsb/init-functions
# If we have upgraded the daemon since we last started it, we can’t use the
# –exec argument to start-stop-daemon, because the daemon’s inode will have
# changed. The risk here is that in a situation where the daemon died, its
# pidfile was not cleaned up, we’ve upgraded it, *and* some other process is now
# running under that pid, start-stop-daemon will send signals to an innocent
# process. However, this seems like a corner case. C’est la vie!
# Update: –name should prevent signalling innocent processes.
SSD_START_ARGS=”–pidfile $PIDFILE –name $(basename $DAEMON) –startas $DAEMON”
SSD_STOP_ARGS=”–pidfile $PIDFILE –name $(basename $DAEMON) –retry TERM/5/TERM/5″
SSD_RELOAD_ARGS=”–pidfile $PIDFILE –name $(basename $DAEMON) –signal 1″
case “$1” in
start)
if [ “$HEED_DEFAULT_DISPLAY_MANAGER” = “true” ] &&
[ -e $DEFAULT_DISPLAY_MANAGER_FILE ] &&
[ “$(cat $DEFAULT_DISPLAY_MANAGER_FILE)” != “$DAEMON” ]; then
echo “Not starting X display manager (xdm); it is not the default”
“display manager.”
else
log_daemon_msg “Starting X display manager” “xdm”
start-stop-daemon –start –quiet $SSD_START_ARGS
|| log_progress_msg “already running”
log_end_msg 0
fi
;;
restart)
/etc/init.d/xdm stop
[ -f $PIDFILE ] && exit 1
/etc/init.d/xdm start
;;
reload)
log_daemon_msg “Reloading X display manager configuration…”
if ! start-stop-daemon –stop –quiet $SSD_RELOAD_ARGS; then
log_progress_msg “not running.”
fi
log_end_msg 0
;;
force-reload)
/etc/init.d/xdm reload
;;
stop)
log_daemon_msg “Stopping X display manager” “xdm”
if ! [ -f $PIDFILE ]; then
log_progress_msg “not running ($PIDFILE not found)”
else
start-stop-daemon –stop –quiet $SSD_STOP_ARGS
SSD_RES=$?
if [ $SSD_RES -eq 1 ]; then
log_progress_msg “not running”
fi
if [ $SSD_RES -eq 2 ]; then
log_progress_msg “not responding to TERM signals”
else
if [ -f $PIDFILE ]; then
log_progress_msg “(removing stale $PIDFILE)”
rm $PIDFILE
fi
fi
fi
log_end_msg 0
;;
&nbs
p;*)echo “Usage: /etc/init.d/xdm {start|stop|restart|reload|force-reload}”
exit 1
;;
esac
exit 0
# vim:set ai et sts=2 sw=2 tw=80:
>1. Siapkan CD Ubuntu Live ataupun Ubuntu USB Live anda
2. Lakukan booting dari Ubuntu live
3. Setelah masuk ke Ubuntu live, bukalah terminal dan login sebagai root
4. Cek list ketersediaan hardisk di lappie anda dengan perintah:
# fdisk -l
5. Lakukan mount untuk partisi tempat ubuntu anda berada. Dikasus ini, teman saya menginstal ubuntunya di drive /dev/sda6
# mount /dev/sda6 /mnt/
# mount -t proc proc /mnt/proc/
# mount -t sysfs sys /mnt/sys/
# mount -o bind /dev/ /mnt/dev/
# chroot /mnt /bin/bash
6. Setelah termount, kemudian kita kembalikan grub ke MBR dengan perintah:
# grub-install /dev/sda
7. Sekarang kita kembalikan grub ke partisi linux-nya
# grub-install /dev/sda6
Kemudian lakukan restart sistem linux anda 🙂
>First download this tools :
– XAMPP @ xampp download
– ZCron @ ZCron
– Bot plurk @ PlurkBot
Second install xampp and zcron, then extract the bot plurk. place it anywhere you want.
Third enable php curl :
– Edit this file C:Program Filesxamppphpphp.ini with notepad
– Uncomment the following line on your php.ini file by removing the semicolon.
– ;extension=php_curl.dll to be extension=php_curl.dll
Fourth start xampp control panel, make a tick on “svc” for Apache, then click start.
5th, extract the plurk2.zip everywhere you want, still remember the path.
edit the bot.php file with notepad. Change “username” and “password” with you plurk ID and Pass.
then save.
then open zcron, add a task there do as 5mnutes.
fill the program with C:xamppphpphp.exe
and the parameter with C:”path to your”bot.php
klik save 😀
>
sudo sed -i 's+^start on starting mountall+start on mounted MOUNTPOINT=/var+' /etc/init/ureadahead.conf
>Sometimes when modem not connected through network manager , we linux user using wvdial.
but there was bug on pidgin, its cant connect through wvdial, this how to solve it.
https://bugs.launchpad.net/ubuntu/+s…47/comments/11
There is a way, but it has become harder with every release.
– Intrepid: enter something in the “away cause” field, pidgin will
connect
– Jaunty: stop NetworkManager while pidgin is running
– Karmic: /sbin/stop network-manager before pidgin is started
“sudo /sbin/stop network-manager” worked like a charm on Lucid! ![]()
And restart pidgin or if pidgin still doesn’t connect use command “pidgin -f”
>oomla merupakan CMS open source terbaik saat ini, banyak sekali pengguna CMS memakai Joomla. Sebelum menginstall Joomla, install dahulu LAMP. Tutorial install LAMP baca di sini.
Download dahulu Joomla, di sini memakai versi 1.5.6 bila ingin versi terbaru, cek di situs Joomla.
cd /var/www
sudo wget http://joomlacode.org/gf/download/frsrelease/8232/30034/Joomla_1.5.6-Stable-Full_Package.zip
sudo unzip Joomla_1.5.6-Stable-Full_Package.zip -d /var/www/joomla
sudo chmod 777 -R /var/www/joomla
Sekarang tiba saat untuk install Joomla, sebelum memulai – lakukan ini terlebih dahulu:
sudo /etc/init.d/apache2 restart
Buka pada browser http://localhost/ akan muncul tampilan seperti ini.
Database Type : mysqlHostname : localhost (disesuaikan dengan host)
Username : root (disesuaikan)
Password : **** (disesuaikan dengan password anda)
Database Name: webjoomla (disesuaikan)
Kemudian akan muncul Main Configuration.
Site Name : Belajar Web (judulnya terserah anda)
Email : admin@webku.com (email anda)
Password : ******* (password untuk website joomla)
Password : Password anda saat Install Joomla
Langkah terakhir adalah menghapus Folder INSTALLATION pada root directory berada pada /var/www/
Sekarang coba kita buka http://localhost/administrator/ atau http://localhost/joomla/administrator
>Sebelumnya untuk membuat bot plurk kita download terlebih dahulu plurk API untuk php dan mendownload API key, kemudian extraks plurk api ke direktory web server anda atau ke server hosting anda. berikut isi dari plurk api yang saya download
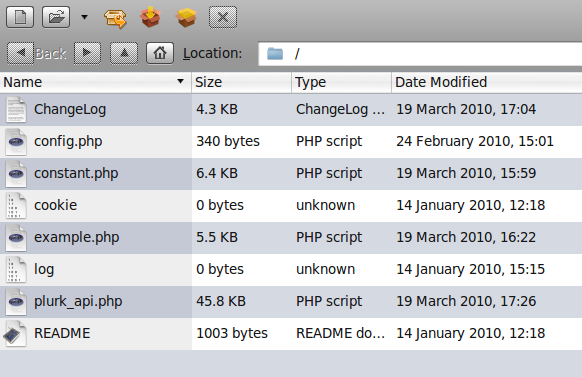
Untuk versi yang saya download adalah versi 1.5.0 😀 .
Disini saya akan membuat dua type both yaitu both untuk update status plurk dengan interval waktu yang bisa diatur dan juga both untuk auto respons ke friend yang bisa di atur waktu dan jumlah teman yang di respons. 😀
Berikut script untuk both update status.
<!--?
// update.php
$api_key = ''; // isi dengan api key
$username = ''; // username plurk anda
$password = ''; // password plurk anda
require('plurk_api.php');
$plurk = new plurk_api();
$plurk--->login($api_key, $username, $password);
$plurk->add_plurk('en', 'says', 'Hello World'); // status / thread yang akan di kirim oleh both
?>
Kemudian untuk both komennya seperti ini :
<!--?
//coment.php
$api_key = ''; // isi dengan api key
$username = ''; // username plurk anda
$password = ''; // password plurk anda


$delay = 100; // cek tiap berapa detik
$offset = NULL;     // cek plurk dari waktu ke sekian
$max_check = 30;    // max berapa plurk yang  dicek
$pesan = 'Hello (bye)';    // pesan yg ingin disampaikan
require('plurk_api.php');
$plurk = new plurk_api();
while (true) {
    $plurk--->login($api_key, $username, $password);
    $result = $plurk->get_plurks($offset, $max_check, NULL, NULL, NULL);
    foreach ($result->plurks as $p) {
        if ($p->response_count == 0) {  // cek kalo blum ada response
 maka both akan bekerja
            $plurk->add_response($p->plurk_id, $pesan);
        }
    }
    sleep($delay);
}

?>
Ok script sudah jadi tinggal kita jalankan. disini timbul pertanyaan mau dijalankan secara manual atau otomatis.. ? kalau manual berarti tinggal di panggil menggunakan browser dan tentu saja merepotkan karena jadi kayak jagain lilin eh jagain both. 😛
Untuk menjalankan secara otomatis kita tinggal memanfaatkan cron job yang sudah ada di sistem operasi linux *untung pake linux* 😛
* */3 * * * /usr/bin/php /home/blackshell/public_html/plurk/update.php
* */3 * * * /usr/bin/php /home/blackshell/public_html/plurk/coment.php
Kode cron job diatas akan secara otomatis berjalan setiap 3 jam sekali.. jadi siap-siap plurk anda saya koment dengan both dalam rentang waktu setiap 3 jam.. (devil)
Bagi yang menggunakan hosting silahkan setting cron job melalui cpanel 😛
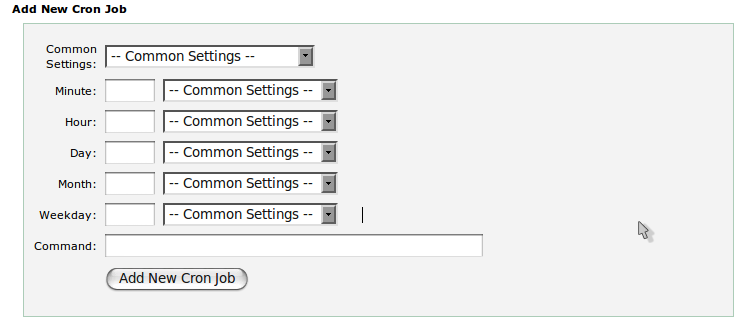
Anda tinggal setting sesuai dengan keinginan anda.
Semoga Bermanfaat..
Adapula contoh script lain
$api_key = ‘api_key’; //ganti dgn api key kamu
$username = ‘uname’; //username kamu
$password = ‘pwd’; //password kamu
$msg= file (“status_list.txt”);
$pesan= $msg[array_rand ($msg)]; // ambil acak
include “plurk_api.php”;
$plurk = new plurk_api();
$plurk->login($api_key, $username, $password);
$plurk->add_plurk(‘id’, ‘:’, “$pesan”);